NLog is a great and awesome tool for logging, it’s supported for .NET, Silverlight and Windows Phone. NLog provide us different kind of targets, used to display, store or pass log messages to another destination, write logs to any number of files, write to event logs and one of my favorites, NLog with Growl.
For next posts, I will show how to configure NLog with email, RavenDB, Sql Server, MySql, Files and Growl as a targets, but in this case I want to show how easy is start to use NLog from scratch.
So first we can create a Console Application with Visual Studio. Then we can get NLog via nuget package
Install-Package NLogalso we need the NLog.Conf
Install-Package NLog.Configthis will install the latest version of NLog it will create us the NLog.Config and NLog.xsd, the NLog.xsd file will needed to Intellisense for Visual Studio and the NLog.config is where we will start to work.
By default the NLog.config file comes with this
<?xml version="1.0" encoding="utf-8" ?>
<nlog xmlns="http://www.nlog-project.org/schemas/NLog.xsd"
      xmlns:xsi="http://www.w3.org/2001/XMLSchema-instance">

  <!--
  See https://github.com/nlog/nlog/wiki/Configuration-file
  for information on customizing logging rules and outputs.
   -->
  <targets>
    <!-- add your targets here -->

    <!--
    <target xsi:type="File" name="f" fileName="${basedir}/logs/${shortdate}.log"
            layout="${longdate} ${uppercase:${level}} ${message}" />
    -->
  </targets>

  <rules>
    <!-- add your logging rules here -->

    <!--
    <logger name="*" minlevel="Trace" writeTo="f" />
    -->
  </rules>
</nlog>
so in the targets section we can define different targets like send to a email, storage into a database, write log messages to the console with customizable coloring that it will be doing right now.
<targets>
    <target name="console" xsi:type="ColoredConsole" layout="${date:format=HH\:mm\:ss}|${level}|${stacktrace}|${message}" />
</targets>

<rules>
    <logger name="*" minlevel="Trace" writeTo="console" />
</rules>
So if you noticed, in “xsi:type” we defined the type of target that we want and in the rule will direct all logs (name=”*”) of level Info or higher (which includes Info, Warn, Error and Fatal) to a target named logfile.
NLog has different types of levels, each log message has associated log level, which identifies how important/detailed the message is. NLog can route log messages based primarily on their logger name and log level.
NLog supports the following log levels:
- Trace - very detailed logs, which may include high-volume information such as protocol payloads. This log level is typically only enabled during development
- Debug - debugging information, less detailed than trace, typically not enabled in production environment.
- Info - information messages, which are normally enabled in production environment
- Warn - warning messages, typically for non-critical issues, which can be recovered or which are temporary failures
- Error - error messages
- Fatal - very serious errors
So now let’s see how it works
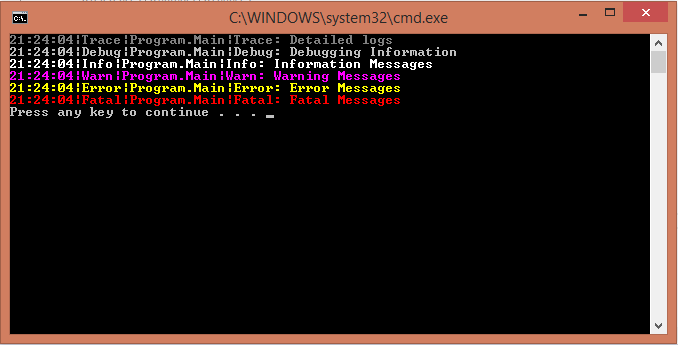
class Program
{
    static void Main(string[] args)
    {
        Logger logger = LogManager.GetCurrentClassLogger();

        logger.Trace("Trace: Detailed logs");
        logger.Debug("Debug: Debugging Information");
        logger.Info("Info: Information Messages");
        logger.Warn("Warn: Warning Messages");
        logger.Error("Error: Error Messages");
        logger.Fatal("Fatal: Fatal Messages");
    }
}
This will display this
Also we can alternatively can call the Log() method and pass log level as the parameter like this:
logger.Log(LogLevel.Info, "Information Messages");
logger.Log(LogLevel.Fatal, "Fatal Error Message");
As you can see each level displays in different color according to the type, this is because in the targets we indicated “ColoredConsole” as a xsi target type.
In the next posts I want to show how can use multiple targets like send to a email, store in database and using Growl Notifications to notify between Windows and Linux, even a smartphone =)
References: